Sunday, January 5, 2014

Nessus 5.2 XMLRPC Automation

Recently, I was trying to use my previously automated Nessus Automation scripts and detected they aren’t working on latest Nessus 5.2 XMLRPC.  Last time, I automated network scanning tasks using XMLRPC in Perl but strange it did not work anymore with Nessus 5.2.

Here’s the error message I got while running my old scripts:

Cannot login to: https://localhost:8834/

I tried to resolve this error, read latest XMLRPC documentation but could not made it working. I then used XMLRPC in Python and this did not worked either. Strange!!!

Next and last attempt was to use XMLRPC in Ruby and this worked for me..:) To make this working, you need to have nessus-xmlrpc gem installed within your ruby installation (obviously). Refer here for complete installation of Ruby and gem on Mac.

Here are my Nessus 5.2 working script using ruby XMLRPC:

#!/usr/bin/env ruby
require 'nessus-xmlrpc'
ARGV.each do|a|
    a = ARGV[1]
    n=NessusXMLRPC::NessusXMLRPC.new('','username','password');
if n.logged_in
  id,name = n.policy_get_first
  puts "using policy ID: " + id + " with name: " + name
  uid=n.scan_new(id,"#{ARGV[0]}","#{ARGV[0]}")
  puts "scanning for: " + "#{ARGV[0]}"
  puts "report will be saved as " + "#{a}_report.xml"
  puts "status: " + n.scan_status(uid)
  while not n.scan_finished(uid)
    sleep 10
  end
  content=n.report_file_download(uid)
  File.open("#{a}_report.xml", 'w') {|f| f.write(content) }
end
end

Above script takes two user input from standard STDIN i.e. IP Address and Report Name using a shell script. Here’s is my shell script that I use to run Nessus against a single IP:

#! /bin/sh
echo "Enter the IP address to scan:"
read ipaddr
echo "Enter the report name:"
read filename
echo "Nessus running for $ipaddr"
ruby nessus.rb $ipaddr $filename
echo "Completed scans for IP: $ipaddr"
echo "Output saved starting with $filename"

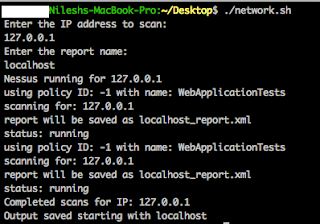
Just copy above scripts and place them in same folder and you are ready to go from terminal. Here’s a sample output for your reference:


Cheers!!! 
Wednesday, December 4, 2013

ColdFusion 10 Remote File Disclosure Exploit

ColdFusion had several exploits in the past. ColdFusion 10 being the latest and stable release from Adobe it was hard to find any ready exploits.

As a part of external pentest, I had no information about the infrastructure in use, platform or installed applications. I ran Nessus as first part of network pentest and found that ColdFusion admin login page exists here: 

http://XX.XX.XX.XX/CFIDE/administrator/index.cfm

Next step is to get the version number. I got this by social engineering techniques..:)

Interestingly, ColdFusion 10 does not display its version number on the homepage now as compared to other previous versions. You need to assume it or need to get it from other means.

The Exploit

The exploit works if ColdFusion is not updated with latest patches, hotfixes and just has a raw installation. The Remote File Disclosure (RFD) allows accessing the operating system files, configuration files, logs, browsing complete server folders and CF admin password hash.

The vulnerability exists in l10n.cfm module as attribute.file parameter does not have validation for path traversal. This is pretty basic and how can Adobe miss this!!!

Vulnerable URL:

http://XX.XX.XX.XX/CFIDE/adminapi/customtags/l10n.cfm?attributes.id=it&attributes.locale=it&attributes.var=it&attributes.jscript=false&attributes.type=text/html&attributes.charset=UTF-8&thisTag.executionmode=end&thisTag.generatedContent=htp&attributes.file=../../administrator/mail/download.cfm&filename=../../../../../../../../../../../../../../coldfusion10/cfusion/lib/password.properties

Notes for successful exploits:

  • You would need to do couple of ../../ before you get onto the password hash
  • You would need to guess coldfusion home directory name
  • You might need to have some knowledge of ColdFusion folder structure. Refer it here.

Post you have access to password hash, next step is to get the Salt so you can perform rainbow table attacks.

Here's a quick reference for you on CF sensitive files. You might want to access them too.


Password Hash URL:

http://XX.XX.XX.XX/CFIDE/adminapi/administrator.cfc?method=getSalt

Having all this information, you may now want to proceed with password cracking. I used ncrack and Hydra for password cracking and it worked pretty quickly as admin password was among the common passwords.

Happy Exploiting CF 10!!! 

Tuesday, July 9, 2013

Configuring ModSecurity with OWASP CRS – Part II

I hope you have successfully installed and configured LAMP and Modsecurity on your Ubuntu 10.04 box (If not, see my last post here). Next step is to configure Modsecurity with OWASP CRS (Core Rule Set) rules. Basically it does not make any sense to just install Modsecurity without configuring OWASP CRS rules as this will not protect you against any web attacks.

Here’s most simplest and workable steps for Ubuntu 10.04 environment:


2.       Extract the contents to folder named "owasp"
3.       Copy owasp folder to /etc/apache2/rules
4.       Rename file modsecurity_crs_10_setup.conf.example to modsecurity_crs_10_setup.conf
5.       Browse to /etc/apache2/conf.d/security file and paste below lines inside <IfModule mod_security2.c>:

Include /etc/apache2/rules/owasp/*.conf
Include /etc/apache2/rules/owasp/base_rules/*.conf

6.       Restart apache2

sudo /etc/init.d/apache2 restart

Try attack payloads:

If configured correctly, you should get a 403 Forbidden page:


Below are the logs from mod security (/etc/apache2/logs/modsec_audit.log):


Your Modsecurity is now configured with basic OWASP CRS which is sufficient to protect you from common web application attacks.


Happy Reading !!!

Monday, June 10, 2013

Configuring ModSecurity with OWASP CRS – Part 1

In this series, I’m gonna write about the installation and configuration of ModSecurity with OWASP CRS on Ubuntu 10.0.4 and Apache2.

I was motivated to write about it when few of my clients just instantly asked me about blocking all known malicious web attacks at web server level itself. I quickly suggested them an open source, reliable WAF solution that suffice to their requirement. Obviously, just installing WAF does not mean that you do not need application security controls.

ModSecurity (developed by TrustWave) is a reliable open source WAF (Web Application Firewall) that sits between end user and your application server i.e. at web server level. ModSecurity has preconfigured basic security rules that are enabled on installation and configuration.

It is important to note that ModSecurity, in itself, provides very limited protection on its own. In order to make ModSecurity useful, it must be configured with rules. OWASP Defender Community has developed and maintains a free set of application protection rules called the OWASP ModSecurity Core Rule Set (CRS). These rules need to be integrated with ModSecurity to enable it to perform its fully functional tasks.

Refer here to read more about ModSecurity.

I searched a lot over internet for similar articles but most of them have incomplete or incorrect information which is a bit disappointing. I have tried to make this article most accurate, simple and to the point.

Background

I have a fresh installation of Ubuntu-desktop-10.0.04.iso (downloaded from here) and a VirtualBox installation (downloaded from here). First, we need to install LAMP (Linux, Apache, MySQL and PHP) on our new box to setup the test environment and run a sample PHP application to test our malicious payloads.

Below are the steps to follow:

Step 1: Download and install LAMP:

sudo apt-get update
sudo apt-get install php5 mysql-server apache2

Installation would prompt you to input MySQL password. Input MySQL password of your choice.

Step 2: Install PHP and MySQL

sudo apt-get install php5-mysql

Post successful installation, you will have LAMP installed on the box. To test setup, open a browser and type http://127.0.0.1. Below page should pop up that indicate successful installation of LAMP:


Step 3: Folder permission and test page setup

Issue below command to change permission of /var/www/ folder to create test.php file under /www/ folder:

sudo chmod 777 /var/www/

Create a test.php file and paste below code:

<?php
$secret_file = $_GET['secret_file'];
include ( $secret_file);
?>

Step 4: Test setup and perform basic attack

Open a web browser and access below URL. You should get passwd file on your browser.


Step 5: ModSecurity installation

sudo apt-get install libxml2 libxml2-dev libxml2-utils
sudo apt-get install libaprutil1 libaprutil1-dev
sudo apt-get install libapache-mod-security

Step 6: Modify folder permission for apache2 and conf.d file to create ModSecurity rules directory:

sudo chmod 777 /etc/apache2/
sudo chmod 777 /etc/apache2/conf.d/security

Issue below commands to copy contents from download directory to /rules directory created under /apache2.

cp -R /usr/share/doc/mod-security-common/examples/rules /etc/apache2/

Note: All ModSecurity rules are now placed under /apache2 directory.

Step 7: Logs collection and configuring ModSecurity rules

Issue below command to create /logs directory under /apache2:

mkdir /etc/apache2/logs/

Modify /etc/apache2/conf.d/security file with below code:

<IfModule mod_security2.c>
        Include /etc/apache2/rules/*.conf
        Include /etc/apache2/rules/base_rules/*.conf
</IfModule>


Step 8: Completing setup

Restart apache:
sudo /etc/init.d/apache2 restart

Try attack payload http://127.0.0.1/test.php?secret_file=/etc/passwd . You should get 403 Forbidden. This indicates successful installation and configuration of ModSecurity Rules.


Below are the reference commands to enable and disable ModSecurity:

To enable ModSecurity:

a2enmod mod-security

Disable ModSecurity:

a2dismod mod-security

Above steps work for me like a charm on Ubuntu 10.0.4. Hope this helps.

In next part, we will have OWASP CRS installed and configured with ModSecurity.

Happy Reading!!!

Wednesday, February 6, 2013

Malware Analysis - Does only WP installation file cleaning makes you secure?


One word answer “NO”. This is based on my experience w.r.t cleaning Wordpress (WP) sites against malware attack. Hackers mostly attack CMS based websites i.e. WP and Joomla by inserting malicious links on target website to redirect users to their sites and rank up in the google search results. You may want to call it as “Illegal SEO techniques”.

Hackers mostly target vulnerable plugins, themes installed on a WP website. They tend to include their malicious data in header.php or footer.php present under /wp-content/themes/<theme_name> as it loads up with every page of your website. It’s a smart way to infect full website with just one file. This is usually hard to detect as the malicious data might be encoded or hidden inside an image.

Ideally when a website is hacked there are few steps that need to be performed immediately:
  1. Replace your website folder with clean copy of website. This will save you from blacklisting by google
  2. Perform a sucuri malware scan i.e. http://sitecheck.sucuri.net/scanner/ to check if you are already blacklisted
  3. Inspect your plugins or themes folder for malicious code
  4. Remove the malicious code from infected file

Once cleaned, next step is to inspect and clean your WP database.

WP Database Inspection

It is equally important to inspect and clean your WP database after you clean WP website files. This is to ensure that the malicious code does not appear again and you have a fully cleaned website. WP database can be accessed using PHPMyAdmin console. Below is the quickest way to do a database inspection:
  1. Login to PHPMyAdmin console
  2. Click on database_name in use
  3. Export your complete database in a .sql format and open it in a text editor
  4. Do a search for malicious code

In most cases, you will find the malicious code in database. Perform below steps to clean:
  1. Identify the table and column in which malicious code exists
  2. Perform PHPMyAdmin search on the infected table and look for the malicious row
  3. Clean malicious code and click on Save
  4. Repeat steps 1-3 for every row in the table

Please note you can run a query on full database as well but this will be more time-consuming and effort will be as equal as performing above steps.

On a final note, the most important things to remember if you own a WP site are:
  1. Backup, backup, backup your website
  2. Keep your WP version up-to-date
  3. Have few of the security plugins installed for your WP website

Happy Reading!!!

Wednesday, November 14, 2012

Intercepting Android Native Application


Recently, I got an opportunity to do a security hands-on on an Android native application. This application does not communicate to internet via HTTP protocol or mobile browser. The application communicates with the remote server over TCP on some XYZ port.

From my past Android experience and papers I read on internet, it was only mentioned about intercepting browser based application traffic. Some of the papers mentioned about native apps but those apps eventually communicate over HTTP protocol. Read here for traffic interception for HTTP based application.

Challenge Scenario

Native app perfectly works fine when no proxy is set-up on emulator and is connected to internet over wi-fi. The moment I change APN settings of Android emulator, application stops and throws a “Network Error” without any more details.

The Solution

Initially I wanted to capture and modify the traffic as we do for normal Android web app and apply web app security test cases. After digging into the problem for quite some time, I got my hands onto debugging of Android with tcpdump. This allowed me to create a pcap file and then conduct analysis using wireshark in a normal traffic analysis way.

The Steps

Start Android emulator using emulator.exe present in /tools/emulator.exe
Issue command:

emulator.exe avd avd_name -tcpdump apptraffic.pcap


This command will start your emulator in a new window and will dump all traffic sent and receive to a apptraffic.pcap file.

The file can then be imported to wireshark for further analysis. Here’s a screenshot:


With careful analysis of TCP packets you can detect server IP address and port. To further filter out your result and capture only for specific port use below switch:

emulator.exe avd avd_name -tcpdump apptraffic.pcap port 10004

Happy Reading!!!

Thursday, September 6, 2012

Managing Wordpress and Joomla Security

In the last 6 months, I have noticed that there is an exponential increase in hacking activities specially targeted to CMS based websites i.e. Wordpress and Joomla. Both these platforms offer business owners a comfortable base to built application within no time. Additionally, CMS offers some really cool plug-ins that can be easily integrated to your website. Because of its usability, popularity and known weaknesses hackers make it as an easy target.

Here’s some statistics on attack motivation and distribution as on August 2012 (source: Hackmageddon)


Where is the problem?

CMS vendors (Wordpress and Joomla) regularly release new versions when it finds that there is a need to upgrade or new feature to offer or any security vulnerability is detected. This is really good and it shows reactive nature of vendors. This introduces a problem too. Business owners do not generally prefer to upgrade their platform version as it introduces a lot of risk to their business. When a website is hacked, it loses user base, trust and sometimes even they are out of business.

Wordpress and Joomla have lot many version specific exploitable vulnerabilities that can be easily exploited by script-kiddie by a simple google search. This really highlights the need to upgrade your CMS platform as new release comes out in the market.

Attackers have an easy way to detect what platform you are using. Below is the technique to detect: 

Wordpress:
Joomla:
What next?

Every business is critical and everyone wants their business to be profitable and secure. To achieve the level of satisfaction, I recommend at least follow below basic best practices for your website. 

Based on my CMS security assessment experience, I will list out the best practice that you must follow to strengthen security of your website:
  • Try to have up-to-date CMS version
  • Disable Directory Listing on your website – This is the first thing hackers look for to map your application directory structure
  • Set 644 (rw-r--r--) Permission on all your .htaccess, index.php and config files
  • Change your administrator Default Username from “admin” to “anything”
  • Maintain an inventory of Trusted Users for remote access and ensure to revoke their right once the work is completed
  • Apply Access Restriction on your admin module (as this is only used for administration purposes by limited people) or change your admin path from /administrator to /siteadm/adm.php. The idea is to remove /administrator directory from CMS installation 
  • Delete all Default Configurations and redirect users to application customized error page
  • Audit and remove HTTP Response Header that discloses your CMS version, web server version and operating system details
  • Remove all Unused or Unreferenced files from your CMS installation directory
  • Apply strict Password Policy for FTP, Admin module and any other remote access to your server. Your policy must include:
    • Must be 8 characters in length
    • Must be alpha-numeric
    • Must change every month
  • For Joomla Based Websites, ensure:
  • Ensure you have up-to-date Antivirus and Malware tool installed on your server and it scans your application files on a weekly basis. I recommend to use ClamAV.
  • Deploy a Web Application Firewall and configure it to prevent at least some of the common web application attacks. For linux environments, mod_security is the recommended one.
  • Install a Wordpress and Joomla security scanner to quickly detect and fix the security issues. Below are the recommended one:
  • Ensure all your application files are linked completely and do not disclose any internal server path