Showing posts with label Nessus. Show all posts

Sunday, January 5, 2014

Nessus 5.2 XMLRPC Automation

Recently, I was trying to use my previously automated Nessus Automation scripts and detected they aren’t working on latest Nessus 5.2 XMLRPC.  Last time, I automated network scanning tasks using XMLRPC in Perl but strange it did not work anymore with Nessus 5.2.

Here’s the error message I got while running my old scripts:

Cannot login to: https://localhost:8834/

I tried to resolve this error, read latest XMLRPC documentation but could not made it working. I then used XMLRPC in Python and this did not worked either. Strange!!!

Next and last attempt was to use XMLRPC in Ruby and this worked for me..:) To make this working, you need to have nessus-xmlrpc gem installed within your ruby installation (obviously). Refer here for complete installation of Ruby and gem on Mac.

Here are my Nessus 5.2 working script using ruby XMLRPC:

#!/usr/bin/env ruby
require 'nessus-xmlrpc'
ARGV.each do|a|
    a = ARGV[1]
    n=NessusXMLRPC::NessusXMLRPC.new('','username','password');
if n.logged_in
  id,name = n.policy_get_first
  puts "using policy ID: " + id + " with name: " + name
  uid=n.scan_new(id,"#{ARGV[0]}","#{ARGV[0]}")
  puts "scanning for: " + "#{ARGV[0]}"
  puts "report will be saved as " + "#{a}_report.xml"
  puts "status: " + n.scan_status(uid)
  while not n.scan_finished(uid)
    sleep 10
  end
  content=n.report_file_download(uid)
  File.open("#{a}_report.xml", 'w') {|f| f.write(content) }
end
end

Above script takes two user input from standard STDIN i.e. IP Address and Report Name using a shell script. Here’s is my shell script that I use to run Nessus against a single IP:

#! /bin/sh
echo "Enter the IP address to scan:"
read ipaddr
echo "Enter the report name:"
read filename
echo "Nessus running for $ipaddr"
ruby nessus.rb $ipaddr $filename
echo "Completed scans for IP: $ipaddr"
echo "Output saved starting with $filename"

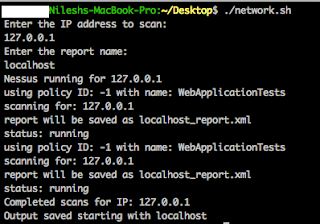
Just copy above scripts and place them in same folder and you are ready to go from terminal. Here’s a sample output for your reference:


Cheers!!! 
Tuesday, August 23, 2011

Automating Nessus Capabilities


In the process of automating network scans for large networks there is a necessity to automate Nessus scans as well. The major advantage and most important point of this automation is that it allows you to do a Schedule scan in Home Feed version (which is only available in Pro feed) and the easiest part is your scans would run as if you are running from your Nessus web interface client.

Below Nessus automation perl script takes the first policy defined in your Nessus web browser client to run the scans. The script is based on my previous concept of Automating NMAP:

use Net::Nessus::XMLRPC;
$file = "ipadr.txt";
my $n = Net::Nessus::XMLRPC->new ('','admin','admin');  #Enter nessus username and password
die "Cannot login to: ".$n->nurl."\n" unless ($n->logged_in);
print "Logged in\n";
my $polid=$n->policy_get_first;
print "Using policy ID: $polid ";
my $polname=$n->policy_get_name($polid);
print "with name: $polname\n";
my $targets;
my $scanid=$n->scan_new_file($polid,"report",$targets,$file);
print "Performing scan on:\t$scanid\n";
while (not $n->scan_finished($scanid))
{
print "$scanid: ".$n->scan_status($scanid)."\n";
sleep 15;
}
print "$scanid: ".$n->scan_status($scanid)."\n";
my $reportcont=$n->report_file_download($scanid);
my $reportfile="report.html";
open (FILE,">$reportfile") or die "Cannot open file $reportfile: $!";
print FILE $reportcont;
close (FILE);

How to Run:

1.       Install perl and Net::Nessus::XMLRPC module
2.       Create a file named “ipadr.txt” and dump your entire IP list here; one entry on each line. For ex:
       
       10.0.0.1
       10.0.0.2
       10.0.0.3

3     Copy the above script in a textpad and save as nessus.pl
4.       Place nessus.pl and ipadr.txt in same folder. Ex: C:\Auto_Nessus
5.       Go to command prompt and browse till C:\Auto_Nessus.
6.       Fire command:

       perl nessus.pl

7.       The report will be saved in same folder as report.html. Alternatively, you can login to Nessus web client and view your report from there as well.

The next task is to make this script to work with the Windows Scheduler. Copy the below code in a textpad and save it as “Nessus_scan.bat”:

@ECHO OFF
REM cd to folder location
cd C:\Auto_Nessus
perl nessus.pl

Open your windows scheduler and schedule the batch file to execute at your desired time.

Happy Scanning!!!