Monday, October 13, 2014

Way to go – CREST Certified

Monday morning and you hear the great news. How does it feel? Just received an email from CREST Australia that I have cleared the exam and now I’m CREST certified professional…J I’m all excited…J

For people who do not know about the certification, it’s an industry standard IT security certification for penetration testers that certifies that the individual follow best practice methodologies and the highest standards of test hygiene and conduct (applicable preforming any technical security assessment). Additionally, the certification also provides confidence to the buyer that the work will be carried out with up to date knowledge of the latest vulnerabilities and techniques used by real attackers.

The experience and pattern of the exam is simply amazing. The pattern actually tests the knowledge of the individual having both written and practical components. Its not all about memorising or mugging stuff. You actually have to demonstrate your pentesting skills with the time restriction applied. And yes, its completely different than any other paper based examinations.

Unfortunately I cannot disclose much about the exam as I’m bounded with CREST NDA (as all other candidates are). As a tip, I can only say is to go through the syllabus thoroughly and prepare the practicals well as they are the most time consuming and should take your major chunk of preparation.


All the best and Cheers…J

Tuesday, August 19, 2014

Utilizing Metasploit Database in Netwok Pentest

What’s the first thing come to your mind when you think of doing network pentest of over 1000 IPs in couple of weeks? Is it really possible? Answer is YES!!!

My ONLY choice is Metasploit Database. This handy tool is too awesome that it helps not only to exploit the vulnerabilities directly from the Metasploit console but also saves plenty of time and prevents you to be in a messy situation. So how do you start?

Fire up your Metasploit and type db_status command to check if you have Metasploit database installed or not. If not, refer here, here and here to set it up. Assuming you have everything setup, lets get started.
  • Grab the list of subnets that are in scope.
  • Detect live host (NMAP -sP <Subnet_IP>) and dump these IP into a text file i.e. ip.txt. This step will take a bit of formatting effort.
  • Fire up your NMAP to start network scans [and keep it running]. Note that Metasploit DB takes XML formatted output. This is the easiest way to get things running smoothly.
  • To run NMAP, following is the most efficient command for TCP scans. Obviously, this part will take long time to complete as there is bunch of IP address(s) to scan.

    sudo nmap -sV -v -O -Pn -iL ip.txt -oX network-scan.xml

          Do -sU in case you want to perform UDP scans as well. 
  • Leave the scans running for overnight and it should be completed next morning when you come back to hack..:)
  • Next, import the NMAP XML output file to Metasploit. Here’s how you connect to Metasploit DB.  
    db_connect <username>:<password> @localhost:5432
  • Create workspace to import scan results and get things organised. The Metasploit command for this is: 

    workspace –a <Workspace_name>

          Refer here for all Metasploit database commands.
  • Now its time to import your NMAP results to Metasploit database. To import the XML file, do 

    db_import <Path_of_XML_file>
  •  Now you are ready to go and exploit utilising all Metasploit exploits..:)

 The take aways from this approach is: 
  • You can utilize all Metasploit exploits within seconds.
  • Use –R switch to directly import RHOSTS list into the exploit.
  • Conduct pentests in a most structured and organised manner.

Happy Hacking!!!


Monday, June 30, 2014

Local Data Storage Analysis with iOS Simulator

There have been times when a penetration tester is not able to install iOS application on a physical device while performing iOS application security assessment. This can happen due to various reasons:
  • Application does not support your iOS firmware version
  • Pentester does not own iOS device or is not jailbroken
  • Pentester cannot install .IPA file using iTunes

If one of the above happened to you then you need to go back to customer and ask for application’s Xcode project. Once you have this, open the xcworkspace file in Xcode and simply run the code. Ensure you select iOS simulator device to run your application. Here’s how you can do this:

XcodeàProductàDestinationàChoose Device


Once you have this, you should be able to run your application in iOS simulator. What next?

Next, I would suggest you to browse the application, input data, create records, etc. within the application. This will make the application run as in you are in real environment and allow application to do all scary stuff on your Simulator.

To inspect what application has stored locally, browse to below path (using Finder or Terminal):

~/Library/Application Support/iPhone Simulator/7.0.3/Applications/<UNIQUE_ID>/Documents
~/Library/Application Support/iPhone Simulator/7.0.3/Applications/<UNIQUE_ID>/Library

In above locations, you should be able to view below folders:

Caches - Stores application database files
Preferences - Stores application .plist files

You can now view .plist files using any text editor and could view database files using SQLiteStudio (free lightweight utility). The tool is really simple to operate and gets you what you are looking for very quickly.


Happy Reading!!!


Monday, March 17, 2014

Multiple IP Nessus 5.2 Automation Script

It is always been a pain to run Nessus when you have long list of IPs to be scanned within a short period of time. This typically happens when you are engaged in an internal pentest and you have multiple IPs to scan.

To solve this, I have written a Ruby script which enables Nessus to read list of IPs from a text file, perform individual scan, export it to XML format and saves a copy of the scan over Nessus web interface. This script is very similar to my last script with few changes in terms of reading IP from a text file. Please note that you would need to install nessus-xmlrpc gem to get this running.

Here’s a ruby script for running Nessus against multiple IPs:

require 'nessus-xmlrpc'
n=NessusXMLRPC::NessusXMLRPC.new('','admin','admin');
if n.logged_in
  id,name = n.policy_get_first
  puts "using policy ID: " + id + " with name: " + name
  File.open("ip.txt").each_line do |line|
  uid=n.scan_new(id,"#{line}","#{line}")
  puts "scanning for: " + line
  puts "status: " + n.scan_status(uid)
  while not n.scan_finished(uid)
    sleep 10
  end
  content=n.report_file_download(uid)
  #File.open('report.xml', 'w') {|f| f.write(content) }
  #File.open("#{line}_report.xml", 'w') do |f|
  f.write(content)
  f.close
  end
end
end

Steps to be followed:
  1. Create a ip.txt file and dump your list of IPs there.
  2. Copy and paste above script in nessus.rb file.
  3. Place both these files under one folder and fire below command from your terminal.

 ruby nessus_file.rb

The output will be saved in the same folder and copy of scan will be available on your Nessus web interface.


Happy Automating!!!

Sunday, January 5, 2014

Nessus 5.2 XMLRPC Automation

Recently, I was trying to use my previously automated Nessus Automation scripts and detected they aren’t working on latest Nessus 5.2 XMLRPC.  Last time, I automated network scanning tasks using XMLRPC in Perl but strange it did not work anymore with Nessus 5.2.

Here’s the error message I got while running my old scripts:

Cannot login to: https://localhost:8834/

I tried to resolve this error, read latest XMLRPC documentation but could not made it working. I then used XMLRPC in Python and this did not worked either. Strange!!!

Next and last attempt was to use XMLRPC in Ruby and this worked for me..:) To make this working, you need to have nessus-xmlrpc gem installed within your ruby installation (obviously). Refer here for complete installation of Ruby and gem on Mac.

Here are my Nessus 5.2 working script using ruby XMLRPC:

#!/usr/bin/env ruby
require 'nessus-xmlrpc'
ARGV.each do|a|
    a = ARGV[1]
    n=NessusXMLRPC::NessusXMLRPC.new('','username','password');
if n.logged_in
  id,name = n.policy_get_first
  puts "using policy ID: " + id + " with name: " + name
  uid=n.scan_new(id,"#{ARGV[0]}","#{ARGV[0]}")
  puts "scanning for: " + "#{ARGV[0]}"
  puts "report will be saved as " + "#{a}_report.xml"
  puts "status: " + n.scan_status(uid)
  while not n.scan_finished(uid)
    sleep 10
  end
  content=n.report_file_download(uid)
  File.open("#{a}_report.xml", 'w') {|f| f.write(content) }
end
end

Above script takes two user input from standard STDIN i.e. IP Address and Report Name using a shell script. Here’s is my shell script that I use to run Nessus against a single IP:

#! /bin/sh
echo "Enter the IP address to scan:"
read ipaddr
echo "Enter the report name:"
read filename
echo "Nessus running for $ipaddr"
ruby nessus.rb $ipaddr $filename
echo "Completed scans for IP: $ipaddr"
echo "Output saved starting with $filename"

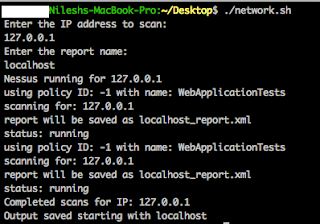
Just copy above scripts and place them in same folder and you are ready to go from terminal. Here’s a sample output for your reference:


Cheers!!!